The full whitening experience your clients can see, feel, and value. 3 rounds, 1 beautiful reveal, and a session that feels worth every dollar.
Lesson 3 of 5 | 15 min read
2-3
Rounds
15
Min each round
45
Min chair time
$83
Profit
The experience
Clients pay for an experience
Clients do not pay for minutes. They pay for an experience. The Paint-On System gives them one.
Your client paints professional whitening gel onto their own teeth, relaxes under the LED light, and repeats for 2-3 rounds. They watch the process happen, they feel cared for, and they leave with a result they earned. At $99, it feels like a professional treatment, because it is one.
Most dealers start with Pre-Filled: the Pre-Filled LED Kit in Lesson 2 is our number 1 system and the fastest session to run. Paint-On is a great second service for clients who want the full experience.
In this lesson you will learn
What is inside the Paint-On kit
How to set up your station
The 3 round protocol, step by step
The painting technique to coach every client
How to make $99 feel like a luxury
Troubleshooting the most common questions
Chapter I
What is inside the kit
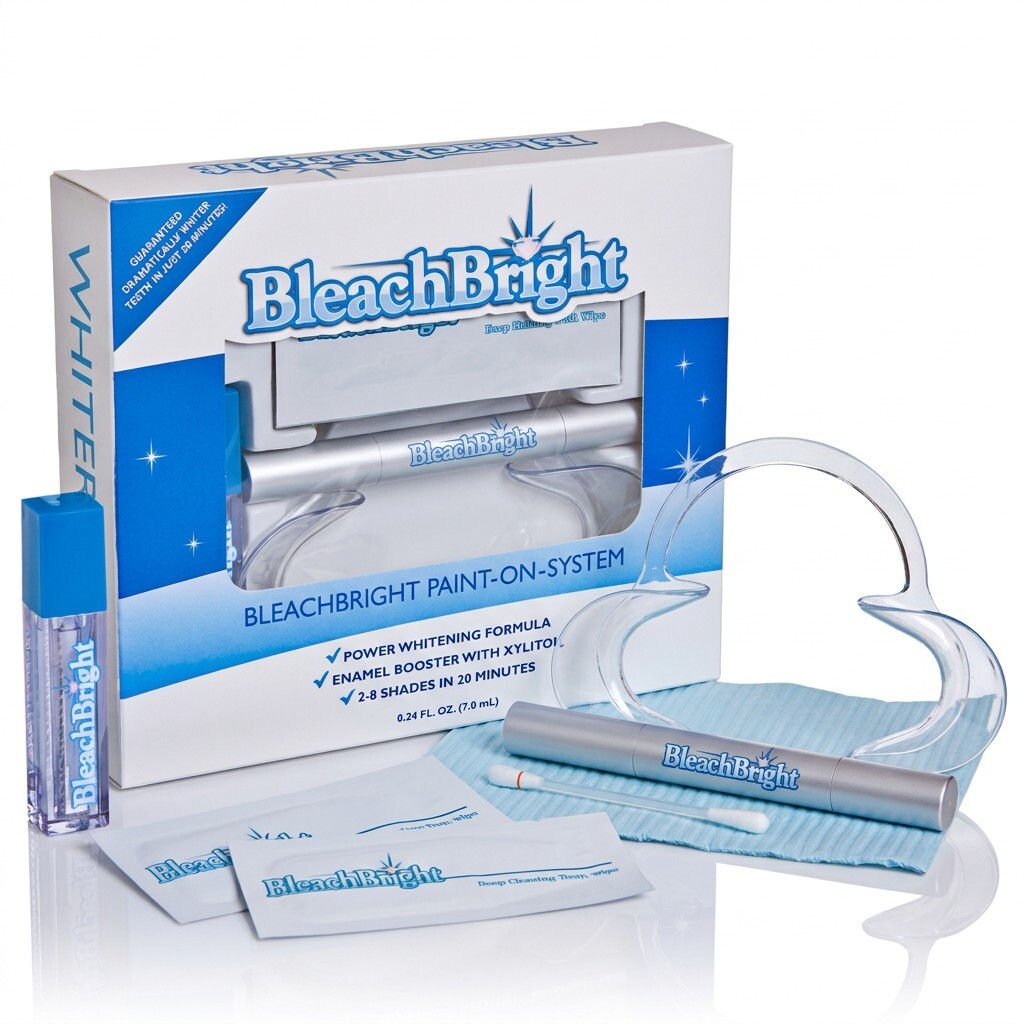
Every Paint-On kit is a single-client, single-use kit. Open a fresh kit in front of your client every time. It shows them everything is new, sealed, and made for them.
The BleachBright Paint-On System, with the silver BleachBright whitening pen
Silver whitening pen
The silver BleachBright pen holds professional whitening gel with a built-in brush. Twist the base to feed gel to the tip.
Lip retractor
Holds the lips away from the teeth so the gel stays where it belongs.
Vitamin E swab
Coats and protects the gums and lips before any gel goes on.
2 teeth wipes
1 to clean the teeth before painting, 1 to polish them after the final round.
Self-stick bib
Protects clothing and catches the retractor at the end for clean disposal.
Enamel booster
A finishing treatment applied after whitening to leave teeth smooth and glossy.
You also need: the LED whitening light, protective eyewear, a hand mirror, a shade guide, and a comfortable reclining chair.
Chapter II
Setting up your station
A calm, organized station tells the client they are in professional hands before you say a word. Set it up before they walk in.
Chair reclined slightly
LED whitening light plugged in and angled toward the chair
Sealed Paint-On kit, protective eyewear, and hand mirror
Record starting shade
You can play soft music for your client if you prefer.
Chapter III
The 3 round protocol
The client does every step that touches their mouth. You guide, time, and position the light. Follow this order every time.
The session at a glance
45 minutes, 3 rounds
Seat
Client sits and reclines
Prep
Bib, Shade, Retractor, Vitamin E, teethwipe
Round 1
Paint + 15 min light
Round 2
Repaint + 15 min light
Round 3
Repaint + 15 min light, if desired
Reveal
Teethwipe, shade
0 minabout 45 min
Seat and prep
01
Seat, retract, protect
Seat your client in the reclined chair first, then open the kit. The customer places the self-stick bib on their shirt and you get their starting shade. They insert the lip retractor and they run the vitamin E swab along their gums and lips.
ClientEvery step YouHand items and explain each one
02
Clean the teeth
The client uses the first teeth wipe like a toothbrush, rough side against the teeth, across every surface that will be whitened. Clean, dry teeth let the gel make full contact.
ClientWipes YouHold the mirror
Round 1
03
Paint a thin layer
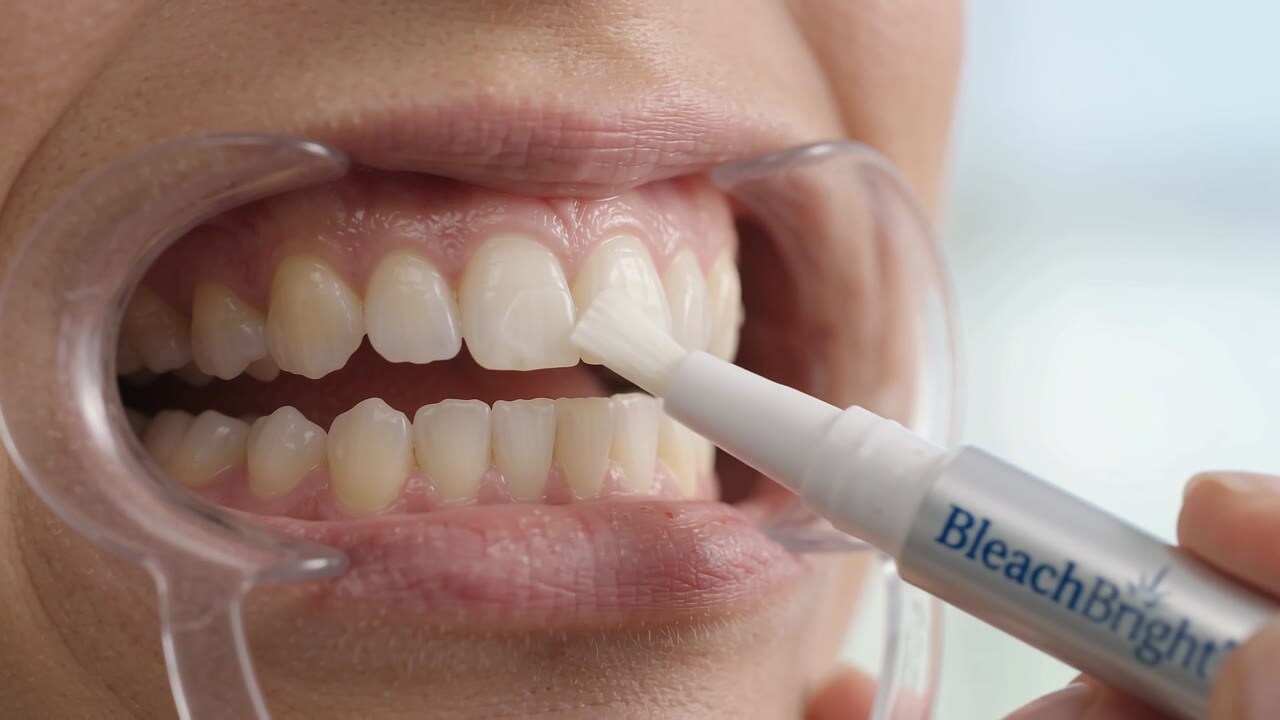
The client twists the base of the silver pen until gel reaches the brush, then paints a thin, even layer on the front of the teeth while looking in the mirror. Only the white brush tip touches the teeth.
ClientPaints YouHold the mirror, coach the technique
04
Eyewear on, light on
The client puts on the protective eyewear. You position the LED whitening light 1 inch in front of the teeth and turn it on for 15 minutes. The client relaxes.
ClientEyewear, relax YouLight
Rounds 2 and 3
05
Repaint and repeat
When the timer ends, move the light away. Keep the retractor in. The client paints a fresh thin layer over the teeth, and the light goes back for another 15 minutes. Do this for round 2, then again for round 3 if desired.
ClientRepaints YouLight, check-in
Finish
06
Remove and dispose
Turn off and move the light away. The client removes the retractor and drops it into the bib, then folds the bib closed for disposal.
ClientRemoves YouLight off, open the trash
07
Polish and boost
The client uses the second teeth wipe, rough side against the teeth, to remove any remaining gel. Then offer the bluminerals sealer tray. There is an blue enamel booster gel vial in the box to give to them for take home that they can brush on before staining foods or beverages to prevent staining as it puts a seal on the teeth.
ClientWipes, sealer YouHand items
08
The reveal
Hold the shade guide beside their smile and record the ending shade. Give them a mirror to see their new smile!
ClientSmiles YouShade, mirror
Chapter IV
The painting technique
Your client does the painting, so your coaching makes the result. Teach these 6 points before round 1 and repeat them as needed.
Watch the technique: only the white brush tip touches the teeth, from the middle of the tooth down to the edge.
Thin beats thick
A thin, even coat works best. Thick gel does not whiten faster, and it is more likely to slide off the tooth.
Paint the smile zone
Cover the front of every tooth that shows in a smile, upper and lower, usually the front 8 to 10 teeth.
Vitamin E & painting teeth only
They apply Vitamin E to the gums and lips. Only the white brush tip touches the teeth. Start each stroke in the middle of the tooth and brush down toward the edge, leaving a small gap above at the gums.
Use the mirror
They use the mirror where the client can see every tooth. They should never paint blind.
Twist, then paint
A few twists of the pen base feeds enough gel for each round. If the brush looks dry, twist once more.
Retractor stays in
The retractor stays in place for all 3 rounds so the lips never touch the gel.
The 1 line to coach
"Thin coat, teeth only, every round."
Chapter V
Making $99 feel like a luxury
The Paint-On System gives you 45 minutes with your client. Use them. These 5 moments turn a whitening session into an experience clients rebook and talk about.
The welcome
Get their starting shade.
The unboxing
Open the sealed kit in front of them and name each item as you hand it over. It shows care and makes the product feel professional.
The comfort
Recline the chair, and play calm music if you choose. Check in at the start of every round and half way through.
The Sealer
Offer the bluminerals sealer to protect their whitening. Get their ending shade and hand them the mirror.
The send-off
Offer them a take home product for touch-ups and maintenance until their next whitening.
Say this during the session
"Round 1 is on. Relax, close your eyes, and enjoy the next 15 minutes. I will be right here."
"Great round. Let's add a fresh coat. Each layer keeps lifting the stains."
"Take a look at your new smile."
Chapter VI
Troubleshooting
Gel touched the gums
The client wipes it away with a clean tissue. A white edge on the gums can appear and fades within a few hours.
Client feels tingling
Move the light away and check in. A light tingle is normal and fades. If it is strong or keeps building, end the session.
Retractor feels tight
The client can adjust it themselves between rounds. A small dab of vitamin E on the lip corners adds comfort.
Pen brush looks dry
Twist the base 1 to 2 more times and wait a moment for the gel to reach the brush.
Uneven or white spots
Normal right after any whitening. Spots usually blend and calm down over the next 24 hours. These are called calcium deposits and are the genetic makeup of the teeth. Some people have them, some people don't. These coming out are proof that the whitening worked.
Lesson 3 in 5 lines
Prep, clean, then 3 rounds of 15 minutes, with a fresh coat each round.
The client does every step that touches the mouth. You position the light.
Thin coat, teeth only, light 1 inch away, eyewear on every round.
bluminerals sealer, take their final shade.
The welcome, the comfort, and the reveal are what make $99 feel like a luxury.
Knowledge check
Test yourself
Answer in your head, then tap to reveal. Each topic appears on the final certification exam.
How many rounds is a Paint-On session, and how long is each?
3 rounds of 15 minutes under the light, with a fresh coat of gel each round.
Who paints the gel onto the teeth?
The client, every time. You coach and run the light.
What goes on the gums and lips before any gel?
The vitamin E swab, after the retractor is in place.
How far from the teeth does the light go?
1 inch, with the client wearing protective eyewear.
Should the client paint a thick coat for faster results?
No. A thin, even coat works best and stays on the tooth.
What does the second teeth wipe do?
It removes remaining gel after round 3, before the enamel booster and the reveal.
Ready to offer the Paint-On System
Your first 10 sessions are in the box
The Quick Start Package includes the LED whitening light, eyewear, shade guide, training materials, and 10 client kits in Pre-Filled or Paint-On, your choice.
Tell us about your business and our team will help you choose the right starter package for your space, your clients, and your goals. Prefer to talk now? Call 866-700-3772.